13소프트웨어 업데이트·API·스크립트소프트웨어 업데이트·API·스크립트
마지막 장은 Gaia를 최신으로 유지하고, 외부 프로그램과 연동하며, 스크립트로 자동화하는 세 가지를 묶습니다. 먼저 소프트웨어 업데이트 엔진 CPUSE 로 Check Point 제품과 Gaia OS 자체를 업데이트하는 법을 보고, 다음으로 프로그램으로 Gaia를 다루는 Gaia RESTful API, 마지막으로 셸 스크립트 안에서 Check Point 명령을 제대로 돌리기 위한 준비 작업을 다룹니다.
CPUSE — Gaia 소프트웨어 업데이트
CPUSE(Check Point Upgrade Service Engine)를 쓰면 Gaia OS 위에서 도는 Check Point 제품들과 Gaia OS 자체를 자동으로 업데이트 할 수 있습니다. 업데이트 대상은 소프트웨어 업데이트 패키지와 전체 이미지(full image) 두 가지로, 메이저 릴리스·마이너 릴리스·핫픽스(Hotfix)를 모두 포괄합니다. 이 모든 CPUSE 작업은 Deployment Agent(DA) 데몬 이 도맡아 처리합니다.
Gaia는 알아서 적용 가능한 업데이트를 찾아 보여 줍니다. 이때 설치된 Gaia OS 버전, 그 컴퓨터의 역할(Security Gateway·Security Management Server·Standalone), 그 밖의 특성 에 맞는 패키지와 이미지만 골라 목록에 띄웁니다. 이렇게 표시된 이미지와 패키지는 Check Point Support Center에서 내려받아 설치합니다. 목록에는 private 패키지 도 직접 추가할 수 있는데, private 패키지란 Check Point Support Center에 올라가 있지만 제한된 대상에게만 공개되는 핫픽스 를 말합니다.
업데이트할 때 챙겨야 할 것
소프트웨어를 업데이트할 때는 다음 세 가지를 반드시 준비합니다.
- 다운로드·설치 CPUSE 정책을 정한다. 다운로드 방식은 세 가지 중에서 고릅니다.
- Manual — 수동 다운로드
- Automatic — 자동 다운로드
- Scheduled — 일정 예약(매일·매주·매월, 또는 한 번만)
설치 방식은 패키지 종류에 따라 다릅니다. - 핫픽스 — 기본적으로 자동으로 다운로드·설치 됩니다. - 전체 설치·업그레이드 패키지 — 반드시 수동으로 설치 해야 합니다. - 메일 알림을 정한다. 패키지 작업이 끝났을 때, 그리고 새 패키지 업데이트가 나왔을 때 메일로 알리도록 설정합니다. - 다운로드와 설치를 실행한다.
Gaia RESTful API — 프로그램으로 Gaia 다루기
이 절은 API 로 Gaia 운영체제를 다루는 방법을 설명합니다.
API 개요
Gaia RESTful API 는 Check Point Gaia 운영체제에서 정보를 읽고 명령을 보내는 통로입니다. Gaia Portal이나 Gaia Clish 명령으로 Gaia를 다루듯이, 똑같은 일을 API 명령으로도 할 수 있어 자동화에 유용합니다.
Gaia API 명령 실행하기
Gaia API 명령은 세 가지 방법으로 실행합니다.
- 서드파티 API 클라이언트 로 HTTPS 연결을 통해 API 명령을 보냅니다.
- Gaia 운영체제의 Expert mode 에서 Check Point
mgmt_cli명령을 씁니다. - SmartConsole 설치 폴더에서 Check Point
mgmt_cli.exe명령을 씁니다.
온라인·로컬 API 레퍼런스
온라인 레퍼런스는 Check Point Gaia API Reference에서 봅니다.
로컬 Gaia API 레퍼런스 는 웹 브라우저에서 다음 주소로 접속합니다.
https://<IP Address or Gaia Management Interface>/gaia_docs/#introduction예:
https://192.168.3.57/gaia_docs/#introduction로컬 Management API 레퍼런스 는 Security Management Server나 Multi-Domain Security Management Server에 존재합니다. 웹 브라우저에서 다음 주소로 접속합니다.
https://<IP Address or Gaia Management Interface>/api_docs/#introduction예:
https://192.168.3.57/api_docs/#introductionGaia API Proxy
Check Point 제품은 API 명령을 지원합니다(Check Point API Reference 참고). Management Server의 Gaia API Proxy 기능을 쓰면, 관리 중인 Security Gateway와 Cluster Member에서 Gaia API 명령을 실행 할 수 있습니다. 흐름은 이렇습니다.
- 관리자가 API 클라이언트로 Management Server에 접속합니다.
- Management Server에서 관리 대상 Security Gateway와 Cluster Member로 Gaia API 명령을 실행합니다.
R82 Management Server의 Gaia API Proxy 기능은 Gaia API를 지원하는 모든 관리 대상 Security Gateway와 Cluster Member 와 함께 동작합니다.
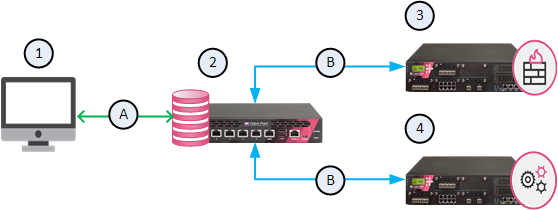
그림 — Gaia API Proxy 구성 예시
| 항목 | 설명 |
|---|---|
| 1 | API 클라이언트 |
| 2 | Gaia API Proxy 기능을 갖춘 Management Server |
| 3 | 관리 대상 Security Gateway |
| 4 | 관리 대상 ClusterXL |
| A | Management API 통신 |
| B | Gaia API 통신 |
동작 절차
1. Management API login 명령으로 Management Server에 로그인합니다.
API 클라이언트로 작업할 때는 Check Point API login 명령으로 Management Server에 로그인합니다(Check Point Management API Reference 참고).
권한을 확인하는 방법은 이렇습니다.
- SmartConsole로 Management Server에 접속합니다.
- 왼쪽 탐색 패널에서 Manage & Settings 를 클릭합니다.
- 상단에서 Permissions & Administrators > Permission Profiles 를 클릭합니다.
- 해당 권한 프로파일을 엽니다.
- 왼쪽 트리에서 Overview 를 클릭합니다.
- Read/Write All 을 골랐다면 — Cancel 을 누릅니다(필요한 권한이 이미 켜져 있습니다).
- Customized 를 골랐다면 — 왼쪽 트리에서 Gateways 를 클릭하고, Scripts 섹션에서 Run One Time Script 를 선택한 뒤 OK 를 누르고, SmartConsole 세션을 Publish 합니다.
2. 관리 대상 Security Gateway와 Cluster Member에서 Gaia API 명령을 실행합니다.
Management API login 명령은 Session Unique Identifier(SID) 토큰 을 돌려줍니다. 같은 API 클라이언트에서, 이 SID 토큰을 Gaia API 명령의 X-chkp-sid 필드에 넣어 실행합니다. Gaia API 구문은 다음과 같습니다.
POST https://<IP Address of Management Server>/web_api/gaia-api/<Gaia API Version>/<Gaia API Command>Gaia API 명령의 본문(body)은 다음 중 하나로 대상 Security Gateway나 Cluster Member를 식별 해야 합니다.
- 객체 이름(Object name)
- 객체의 기본 IP 주소(primary IP address)
- 객체 UID
3. Gaia API Proxy가 지정된 Security Gateway나 Cluster Member에 로그인합니다.
Management Server의 Gaia API Proxy가 명령을 해석해 해당 장비에 로그인합니다.
- 이 로그인은 그 Security Gateway·Cluster Member의 SID를 돌려줍니다.
- Gaia API Proxy는 이 SID로 Gaia API 명령을 실행합니다.
- Gaia API Proxy는 이 SID를 자신의 데이터베이스에 저장합니다 — SID timeout은 Management Server에서 580초, Security Gateway·Cluster Member에서 10분 입니다.
4. Gaia API Proxy가 응답을 API 클라이언트로 전달합니다.
- 성능을 높이려고 Gaia API Proxy는 응답을 Management Server의 Gaia API Proxy 캐시 에 저장합니다.
- 캐시 timeout 안에 같은 요청이 다시 오면, 캐시에 든 응답을 돌려주고 캐시를 갱신합니다.
- 관리자는 Management Server의
$FWDIR/api/conf/cache.conf파일에서 다음 캐시 파라미터를 설정할 수 있습니다.
| 파라미터 | 허용 값 | 설명 |
|---|---|---|
timeout | 0 또는 그 이상 | 다음 Gaia API 명령이 그 명령에 대한 캐시 갱신을 일으키기까지의 시간. 0이면 Gaia API Proxy가 캐시를 쓰지 않고, <integer>이면 응답을 그 초만큼 캐시에 보관합니다(기본 60초). |
total_gateways | integer | 응답을 저장할 고유 Security Gateway·Cluster Member의 개수 를 지정합니다. |
maximum_entries | integer | 각 Security Gateway·Cluster Member마다 저장할 고유 Gaia API 명령의 개수 를 지정합니다. |
예제
예제 1 — show-hostname (객체의 기본 IP 주소로 대상을 식별)
요청:
POST https://<IP Address of Management Server>/gaia-api/show-hostname
Content-Type: application/json
X-chkp-sid: <Session ID>
{
"target" : "192.168.1.1"
}
응답:
"command-name" : "show-hostname",
"response-message" : {
"name" : "gw-832546"
}
}
예제 2 — show-interface (객체 이름으로 대상을 식별)
요청:
POST https://<IP Address of Management Server>/gaia-api/v1.4/show-interfaces
Content-Type: application/json
X-chkp-sid: <Session ID>
{
"target" : "gw-832546",
"name" : "eth0"
}
응답:
"command-name" : "v1.4/show-interfaces",
"response-message" : {
"ipv6-local-link-address": "Not Configured",
"type": "physical",
"name": "eth0",
"ipv6-mask-length": "Not-Configured",
"ipv6-address": "Not-Configured",
"ipv6-autoconfig": "Not configured",
"ipv4-address": "192.168.1.1",
"enabled": true,
"comments": "",
"ipv4-mask-length": "24"
}
}
예제 3 — show-diagnostics (객체 UID로 대상을 식별)
요청:
POST https://<IP Address of Management Server>/gaia-api/v1.4/show-diagnostics
Content-Type: application/json
X-chkp-sid: <Session ID>
{
"target" : "52048978-c507-8243-9d84-074d11154616",
"category" : "os",
"topic" : "disk"
}
응답:
"command-name" : "v1.4/show-diagnostics",
"response-message" : {
"to": 3,
"total": 3,
"from": 1,
"objects": [
{
"total": "34342961152",
"partition": "/",
"used": "5718065152",
"free": "28624896000"
},
{
"total": "304624640",
"partition": "/boot",
"used": "26991616",
"free": "277633024"
},
{
"total": "34342961152",
"partition": "/var/log",
"used": "455684096",
"free": "33887277056"
}
]
}
}
셸 스크립트에서 Check Point 명령 실행하기
셸 스크립트 안에서 Check Point 명령을 실행하려면, 필요한 Check Point 셸 스크립트를 먼저 source(호출) 해 두어야 합니다. 그래야 환경 변수와 함수가 준비되어 명령이 올바른 환경에서 동작합니다. 이 호출은 반드시 맨 윗줄 #!/bin/bash 아래에 넣고, 스크립트 마지막에는 빈 줄(new line)을 반드시 둡니다. 어디서 실행하느냐에 따라 호출해야 하는 스크립트가 다릅니다.
Security Management Server / Log Server / SmartEvent Server
/etc/profile.d/CP.sh 스크립트만 호출하면 됩니다.
source /etc/profile.d/CP.sh
<Applicable Check Point Commands>
[mandatory last new line]
Multi-Domain Server / Multi-Domain Log Server
다음 스크립트들을 아래 순서대로 호출해야 합니다.
/etc/profile.d/CP.sh$MDSDIR/scripts/MDSprofile.sh$MDS_SYSTEM/shared/mds_environment_utils.sh$MDS_SYSTEM/shared/sh_utilities.sh
source /etc/profile.d/CP.sh
source $MDSDIR/scripts/MDSprofile.sh
source $MDS_SYSTEM/shared/mds_environment_utils.sh
source $MDS_SYSTEM/shared/sh_utilities.sh
<Applicable Check Point Commands>
[mandatory last new line]
Security Gateway / Cluster Members (non-VSX)
/etc/profile.d/CP.sh 스크립트만 호출하면 됩니다.
source /etc/profile.d/CP.sh
<Applicable Check Point Commands>
[mandatory last new line]
VSX Gateway / VSX Cluster Members
다음 스크립트들을 아래 순서대로 호출해야 합니다.
/etc/profile.d/CP.sh/etc/profile.d/vsenv.sh
source /etc/profile.d/CP.sh
source /etc/profile.d/vsenv.sh
<Applicable Check Point Commands>
[mandatory last new line]